what should i do prior to removing a jump drive

"Do I really need to safely squirt USB drive? What are the consequences if I neglect to practise and so?"
This question is frequently asked and remains unanswered, which prevents thousands of people from usb safely removal. Neglect to safely unplug USB flash drive can pb you to face up various risks and you can as well lose your information due to information technology. Today, let's talk over the reasons due to which you should e'er safely eject your USB Drive or whatsoever other Drive.
- Part one: Is It Rubber to Remove Wink Drive without Ejecting?
- Part 2: How to Safely Squirt USB from Estimator?
- Part 3: How to Recover Files Lost from USB Drive Using Recoverit Tool?
Part 1: Is It Safe to Remove Flash Bulldoze without Ejecting?
No. It is not rubber to remove Wink Drive or any USB Drive without ejecting it. When your USB Bulldoze is connected with the System, information technology is connected with diverse circuits under the USB ports of the system. Information technology is besides the official all-time pratice given by Microsoft to safely squirt USB before unplugging.
There are various reasons for you to opt for safely USB ejection rather than abruptly removing information technology from the System.
- Abrupt unplug of USB drive can damage the circuits of your USB Drive and as well as of the USB ports of your System. Thus, causing your USB Drive and USB ports of your system to malfunction.
- Unsafe removal of USB drive in between editing or information transfer can corrupt your data on the USB Drive.
- Brutally disconnect wink drive during data transfer might wipe out the entire information stored on USB Bulldoze.
Disconnecting your USB abruptly might cause excursion damage and result in loss of your information from USB Drive or Flash Drive. Thus, it is always recommended that yous should safely disconnect usb device before disconnecting from the System.
Part 2: How to Safely Eject Wink Drive from Figurer?
There are 2 basic methods about how to safely remove flash drive from Computer. You tin use whatsoever of them, as they both are like shooting fish in a barrel and work equally well for the prophylactic removal of your USB Drive.
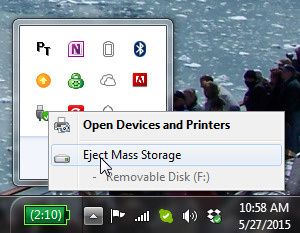
Methods i. Remove via Task Bar
When y'all are on the dwelling house screen of your system and wish to eject your USB. Merely, get to the cease of the Task Bar at the correct-hand side, and click on the USB looking icon that says "Safely Remove USB Device." Once you click, it might take a moment and revert to you with the dialogue "You can at present remove your USB Device." This ways it is now safe for yous to remove the USB Drive.
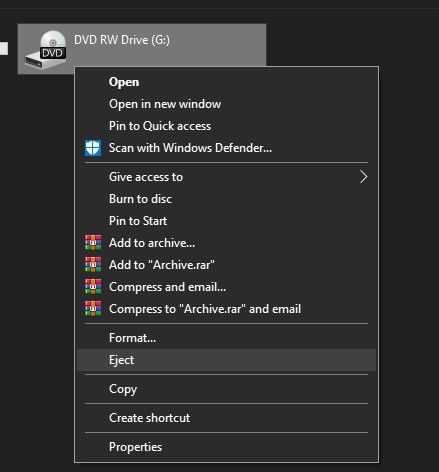
Method 2. Employ "This PC" Window
From the home screen of your Windows, go to "This PC" for Windows 10 or "My PC" for earlier Windows versions. Once you are in the "This PC" window, await for the USB Drive that you desire to squirt nether the "Devices and Drives" section. Right-click on the USB Bulldoze y'all desire to eject and cull the "Eject" option from the pop-up menu. Once y'all click information technology, you can safely eject USB Drive from the arrangement.
If you have failed to safely remove USB stick, which is, without safely disconnect flash drive, then at that place is a risk that you lot might have lost your data. In that case, you tin can use the Recoverit Data Recovery tool to safely recover your data from USB Drive.
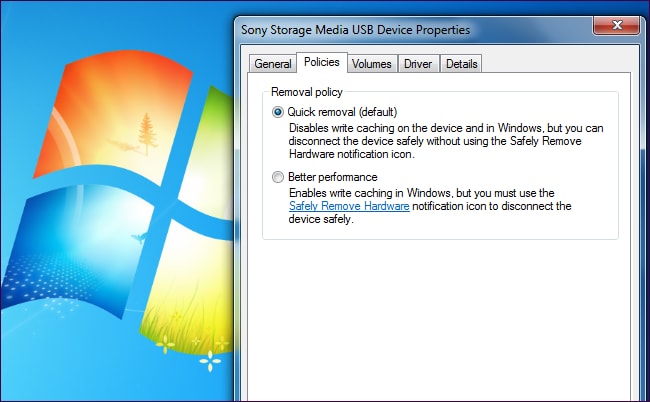
Method iii. Turn On "Quick Removal Mode" in Device Managing director
If the operating system yous are using is Windows 10, congratulations, Microsoft has updated the software to permit you squirt usb device without safely squirt. Follow the steps and prepare: Search "Device Manager" in start menu > Expand the Deejay drives and find your USB flash drive device > right click and select "Properties" > Select "Policies" tab and choose "Quick removal".
Remember, activating "Quick removal" does not mean that you can unplug the USB drive while it'southward working, cruel unplug volition significantly increase the possibility of information abuse. To recover your damaged data from the USB stick, please read on to the next department.
Office 3: How to Recover Files Lost from USB Stick?
Recoverit lets you recover your data lost from USB Drive due to any reasons and whatever circumstances. All yous demand to do is to follow the recovery process and use the powerful features that come with Recoverit.

Recoverit Data Recovery - The Best File Recovery Software
- Supports recovery from all kinds of storage devices similar USB Drive, Pen Drive, SSDs, HDDs, SD Card, etc.
- Allows yous to configure the scanning process using various features and filters like File Types, File Path, Size, Date, Name, etc.
- Recover over m+ types of files.
User Guide to Recover Information from USB Drive:
Preparations:
- Make certain your USB Drive is properly connected and detected by the organisation before nosotros go on. If you don't know your Drive'due south proper noun, alphabetic character, or size then go to "This PC" and check for your recently connected bulldoze under "Devices and Drives."
- Download Windows-compatible version of Recoverit Data Recovery Tool for your System. Simply, browse to the official website of Recoverit and click on the "Download for Windows" options.
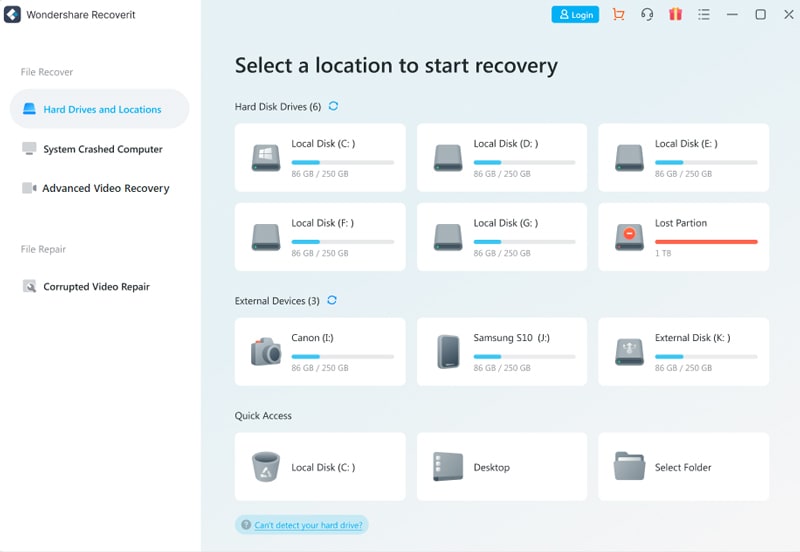
Step 1. Drive Selection
Choose your recently connected USB Bulldoze under the "External Devices" section on the very kickoff window that will appear later launching the tool. Subsequently selecting the USB Drive from which y'all want to recover data, you need to click on "Recover" to initiate the scanning procedure.
Stride 2. Scanning & Listing
In one case the scanning starts, you will be transferred to a new window where you will see all of the recoverable files getting listed equally the scanning proceeds. You tin can configure the scanning and recovery co-ordinate to you past using the features listed beneath:
- On the left-hand side panel, you can select a "File Type" or "File Path" to configure your scanning process appropriately. Once you cull sure values for any of the options, the scanning will only take place for that selected value.
- On the right-hand side panel, you can choose from various "Filters" such as Date, Fourth dimension, File Size, Name, File Type, etc. to filter your search results accordingly. The values y'all choose under the filters will decide the manner your recoverable files volition be listed afterwards scanning.

Step 3. Preview and Recover
Once all the scanned files are listed for recovery, you tin cull to "Preview" the files you wish. You lot can select all the files for bulk recovery, or you tin select some specific files that you lot want to recover from your USB Bulldoze. Once all the files that yous desire to recover are selected, y'all need to click on the "Recover" button and choose a location to restore the files later.

After the successful recovery process, you can access all of your recovered files at the called location. If you are not satisfied with the recovery, y'all can run the recovery process once again with different scanning configurations this time.
Conclusion:
In this article, y'all have learned the importance of safely ejecting USB bulldoze, and how to practive it. Safely removing hardware should exist a general practice to prevent data loss and impairment to your USB Bulldoze. Information technology'south easier to acquire how to safely remove USB drive than to recover the lost data afterward. Only if in instance, you lose the information from your USB Drive, you can e'er apply the Recoverit Data Recovery tool to recover your information.
Other popular Manufactures From Wondershare
Source: https://recoverit.wondershare.com/flashdrive-recovery/safely-eject-usb.html
0 Response to "what should i do prior to removing a jump drive"
Post a Comment